Thursday, February 7, 2013

E.L.F Matte Finisher Top Coat

They can't all be winners.

E.L.F is one of those brands that products are a hit and a miss. Some products are amazing, while some fall flat. Matte Finisher is one of those.


 I tried this Top Coat over quite a few colors, all of them finished with this result. A chalky, streaky mess. I chose to use glitter for the swatch so that you could see what happens. The glitter is KleanColor Chunky Holo Black, and I didn't apply the Top Coat over the upper left corner.

 I have used other E.L.F polishes and gotten wonderful results, so I am not sure if this is from a bad batch, or just a bad product all the way around. Either way, I will not be purchasing this kind again. I couldn't even use the bottle for a franken, because no matter how much it was cleaned the Matte product was still there.

*The item(s) in this post were purchased by me.

Wednesday, February 6, 2013

Konad Polish Swatches & XL Stamper Review

Hey, you two birds- meet this one stone!

 I recently got an XL Stamper, and was having a bit of a time trying to figure out why my luck with it was nowhere near that of others. So, I sat down with full intentions of making it work. It took little to no time to realize that the problem I was having was caused by the included scrapers, and not the stamper itself.


 I am not one of the Nail Girls that use a Shopping Card as a scraper, I have never been able to get the same results as with metal ended ones. But if you are skilled with one, these may be a better option for you- as they are very solid and will not bend. The plastic is probably a whole lot better for the condition of our plates, but I have never had a metal scraper scuff a plate beyond the point of being able to discern the image. While testing the stamper with the plastic scrapers, I noticed that I was pulling too much polish off of the image. No matter what angle I held the scraper at, I wound up with open gaps where polish should have been.  I swapped out for my Konad metal scraper and the difference was enough to make the XL stamper my new best thing. 

 The larger White end of the Stamper is very squishy and pliable. And also somewhat different in what it picks up and leaves behind. It attracts lint and dust like none other, but doesn't seem to leave it behind when transferring. It picks up less polish from around the design lines, leaving crisper images, but it deposits ALL of the polish you pick up. Unlike the Konad stamper, which always has a faint outline of the design left on it, the XL stamper had nothing left after the transfer. Which made for a more pigmented stamp.

 That being said, with the exception of black and white, here is my budding Stamping Polish collection, done with both the Konad and the XL stamper. I chose to do them on paper to save my hands from so much remover. I would rather test them on my hands over something other than black and white, so if you have any suggestions/requests leave them in the comments!  

The Konad is on the Left, and the XL is on the Right in both the black and white bases. 

Both scrapers had been filed.

The Image is from the Pueen 25 plate.


 Pastel Orange
 Move over, Black, we have a new contender for Halloween stamping! See the difference in color on the white paper? That (and all of these) are not from my camera. They are like that because of the layer of polish that stayed behind on my Konad stamper.


 Dark Orange
 I had to stamp this one a couple extra times, just to make sure that the fault was not my own. (Too slow on the transfer, pressing to hard.... a number of things could have made me to blame.) But alas, it was the Konad stamper. I couldn't believe that this one showed up on the dark base, with or without the cool new toy. There really isn't a whole lot of difference between this and the Pastel Orange as far as color goes, in fact I have a pretty hard time telling the bottles apart because they don't have stickers. But when the bottles open, the Pastel is the clear winner.


 Pastel Blue
 Here is the only other from the Pastel line that I have, so far. I have used this one over a few different colors, and it gives wonderful results. 


 Blue
 This Blue is obviously not a good choice for darker bases. The sheered out stamp from the Konad stamper probably wouldn't work very well over anything but the lightest shades.


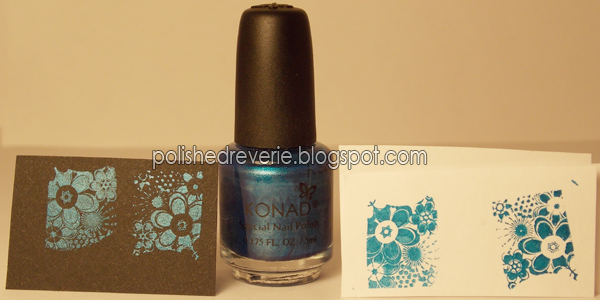
 Blue Pearl
  However, this Blue... Completely makes up for it. It is metallic, and gorgeous. Again, the XL Stamper really gave a bigger bang on the transfer.


 (Not So) Psyche Pink
 This one, and the Blue Pearl came in the Coraline Set A kit that I got from Amazon a while back. As you can tell from the bottles, this one is nowhere near the Psyche Pink that is advertised. I am thinking that it might have came from a bad batch, as I have read reviews that shown others had the same problem. It is less than visible over anything light, but looks elegant over darker shades- which is why I have kept it around. 

 You will notice that there are 2 stamps facing downward on the dark base. They are both using the XL Stamper, but the left I used the plastic scraper. It left bald spots on the petals, but depending on the color combination it may look nice.


Psyche Pink
 Now, This is Psyche Pink. This is another shade that will look good over both light and dark shades, and is very metallic. I have a feeling I will be using this one within the next week.


 Green
 Green has no shimmer, and like the Blue the transfer from the Konad stamper left it a little too sheered out to really cover many darker shades.


 Red
 Red was a lot creamier than I expected, and like the Psyche Pink- I foresee it being put to use in the near future.


 Yellow
 This one was another that surprised me on the black paper, I thought I would have to wait to get the Pastel Yellow to have one that would cover a darker shade. That is obviously not the case.


 Light Gray
 Light "Gray" is almost a  little too purple for my tastes. I need to try it out over some other shades before I decide whether I like it or not.


Violet Pearl
  Violet Pearl is another of the metallic finish set. It doesn't look as pronounced over the black base as the others, but it is still gorgeous.


Chocolate
 The formula on Chocolate is flawless, it stamps wonderfully. I've used this one a few times as well. It was one that I knew I would use as much as a black or white, and that's why I chose the Princess size bottle of it. I got this on Amazon a little cheaper than on their website.


 Black Pearl
 This one also came in a prepackaged Konad kit, along with a White in the same large size. (French Manicure, Set F I do believe.) It doesn't come off as metallic as the other Pearl finishes, but it is still there. I enjoy this one when I am wanting something more than just black, ha.


Final Thoughts


Tips & Tricks 

  • Do file your stamper. (Lightly, with a fine grain.)
  • Do keep your scraper very clean.
  • Don't apply too much pressure.
  • Do practice/test swatch before committing yourself to an entire mani.
  • Do shop around before spending money. Some kits offer more bang for your buck. Some stores/sellers offer a better deal than others.

XL Stamper Set

 Though I will not be using the plastic scrapers, that does not mean you shouldn't test them out. Especially if you are accustomed to using Gift/Shopping Cards, because as I mentioned before- they do not give or bend. (Unless you like the bendy?)

 The XL Stamper itself is where the true gem lies. I do believe that I have found my favorite stamper, and have already been testing (on paper, for now.) regular polishes with it. I have had more wins than fails with my picks to try with because of the simple fact - it leaves nothing behind. 

 I am going to be putting the XS stamper on the opposite end up to the MASH dual ended stamper, I do not have the Konad of that version.

Pueen Cosmetics Plates

 I tested others while trying out other polishes, and like this one- they were wonderful. Not too shallow, and yet not too deep. The full nail images are large, and all have the option of a french end. I had no problems with what stamp swatching I have done. I haven't used them in a full manicure yet though, so more on those at a later time.

*The item(s) in this post were purchased by me.

Monday, February 4, 2013

Simple Valentine's Day Mani

Since Valentine's Day is still over a week away, and I knew that I would want to have another one (or two!) before then, I decided to go for a simple one to kick things off.

Using the stickers that Born Pretty sent me as a gift with my first order, and a dotting tool I added a little bit of whimsy to China Glaze Phat Santa. The dots are Dance Baby, also from CG. I got a little carried away with the Seche Vite on the ring finger and wound up with a little crinkle at the edge that is a lot less noticeable in person, ha!


Phat Santa: While very buildable, goes on sheer but dries with a delicious squishy glass-jelly finish. I really want to see what this looks like under a matte top coat. The blue-tone in the red gave me the Chocolate Candy heart box feels that I had been craving, (Why yes, I am in my late twenties and expect one from my pappaw every year. I get him one too.) making it the perfect base for a little nostalgia. Shown here is 3 coats of the jelly. (Crelly? I don't know. I'm still mastering my finishes.)

Dance Baby: A few dots of this youthful pink cream polish left a ribbon like touch to a very plain, but classic red nail. The more I look at it, I'm kind of wishing that I had inverted the ring finger, and had the full nail in this and the dots in red. You paint, you learn.

The glitter Stickers took very little time to add some decoration. The longest part was getting the sticker off the sheet, but the adhesion is good, so it makes up for it. The style I am wearing is from the XF182 sheet, but there are 24 cute Hello Kitty themed sheets to choose from. (I couldn't take it and had to have them all. Did you see the witch and mermaid ones?!)

Random Bits
  • I took quite a bit of length of my nails while filing, just trying to get them evened up. Which has yet to happen for me. They are a lot easier to manage at this length, and things as simple as opening a can of pop is now less than equivalent to a level 4 disaster. They looked straight at the time I finally dropped the file, but now they look worse. Maybe its the angle. Maybe my vision is lopsided. 
  • However, I did also get a straight edge nail clipper in the order that I made for those other stickers, and am hopeful that my days of partially square nails will be over.
  • I also have my picks from the Color Club Halo Hues 2013 Collection coming soon, as well as a few from their 2013 Spring Collection creams line. I am not sure if that is the name of the collection, but I found them at Enospring while getting the Halo Hues and couldn't resist a few of the shades. They are also listed on Amazon with a bigger picture.
*The item(s) in this post were purchased by me, but included a free gift with order.

Saturday, February 2, 2013

China Glaze - Unplugged swatch

After all the hustle and bustle of many different colors, I enjoy cleansing my nail palate with a good neutral shade. Be it light or dark, it makes no matter as long as its neutral. This (sort-of) oldie but goodie is from the Ecollection line that came out in 2008.

It is a wonderful shade of brown with a hint of some peek-a-boo gold. This is one strategically placed coat and SV on top. I probably could have used a second coat, but I really just wanted to show the strength of it. I mean, who doesn't love a good one coater?

Do you own any of the Ecollection? Do you still use them?

*The item(s) in this post were purchased by me.

Friday, February 1, 2013

Born Pretty Sore - My First Haul!

The majority of my posts so far have been quite image heavy, and this one is no exception.

I recently found Born Pretty Store and waited a nanosecond before picking things out for my first order. Shipping from Singapore to the U.S didn't take very long, and the items arrived nicely packaged and wrapped separately in bubble wrap.


First, I got these awesome Steel Ball Caviar Beads. I have so far only used the black ones on an accent nail, and had lovely results. This is normally a one-day manicure, but I tested their strength and wore them for 3 days. By the end of the second; most of the color had rubbed off leaving a cool shiny silver, but they hadn't started falling off yet, granting them a third day of wear.


And now on to the colors!


Next, I got some Mylar Flakes. Oh yes, you read that right. Loose, flakey goodness. These are easily the product that I am most excited about from this order. I haven't gotten down to brass tacks and tried them out yet, and only manage to stare at them dumbly.


I am undecided whether I want to use these for individual manicures or attempt at frankening. Either way, they are all gorgeous!


Another find that can possibly be used for some frankens is this lovely set of Bar Glitters. They came in a very nice set of colors that I can definitely see myself using.


Next Up is the obligatory set of glitters. I did not choose the normal hexagonal go-to, I opted for their Round Glitter. Much like the Bar Glitters, they came in an impressive collection of colors.


I also got an individual pot of White Round Glitter. This I got for use with a Black Glitter polish, but have yet to try it. The size is larger than the pots that came in the 12 Color Collections.


 I have a few mini-bottles of glitters and things, and wanted some containers to put them in so I grabbed a few of these Pot/Container Box Sets. Only the Round Glitter came in one, leaving quite a few loose jars- so I think I may be looking into a new storage option.


Of course, I had to peruse their plate offerings, and lucked up because they were on sale. I only picked 3, so the hunt for character plates continue!


What's that you say? No character on this plate?!


Why, it's Marie from Aristocats! I fell into a complete stage of giddy when I found this one.

I was also sent a free gift of Hello Kitty stickers that are very cute, I want the other designs!


I am already putting together my next order, ha!

*The items in this post were purchased by me.

Thursday, January 31, 2013

Sally Hansen - Diamond Strength

We all have a few base coats in our collections that we switch back and forth between. I have a tendency to reach for the same few quite a lot, and somehow forget about this one every so often.  As it is only advertised as a hardener, it is likely to be passed over when looking for a good base.
 
It does get thick rather quickly; but a bottle of polish restore/thinner is a must-have for any collection, and keeps the consistency very workable. The main reason why I like using this as a base, is the dry-down texture. It stays kind of tacky, and really does grab the polish. That same reason though, obviously rules it out as a good top coat.

I use this paired with Zoya Remove+ as a prep, and Seche Vite as a top coat and have gotten around a week of wear from every polish I have tried with this method. Absolutely perfect for those busy weeks! And the bonus? My nails are noticeably stronger in the past month or so that I have been using this as my base.


*The item(s) in this post were purchased by me.

Tuesday, January 22, 2013

Finger Paints - Fun-Fetti Swatchboard

I've had this swatchboard for quite a while, and just had to show you guys how versatile that Finger Paints Fun-Fetti really is. Depending on your "overcoat", the overall look of the glitter changes, and falls right in line to match the shade for some gorgeous inlaid action. While the possibilities are endless, here are 12 different ways to get more bang for your buck with the multicolored glitter bomb.

Obviously, some of my choices in overcoat were better than others- but a few of them are definitely standouts.
  • 1. Base - White Cream
    F.P Fun-Fetti
    OverCoat - Zoya Lucy
  • 2. Base - White Cream
    F.P Fun-Fetti
    OverCoat - L.A Colors Color Craze Shock
  • 3. Base - White Cream
    F.P Fun-Fetti
    OverCoat - Milani Neon Awesome Orange
  • 4. Base - White Cream
    F.P Fun-Fetti
    OverCoat - China Glaze Phat Santa
  • 5. Base - White Cream
    F.P Fun-Fetti
    OverCoat - Sally Hansen Hard as Nails Hardcore Party
  • 6. Base - White Cream
    F.P Fun-Fetti
    OverCoat - Spoiled by Wet n' Wild - Checkin' Into Rehab
  • 7. Base - White Cream
    F.P Fun-Fetti
    OverCoat - L.A Colors Color Craze Splash
  • 8. Base - White Cream
    F.P Fun-Fetti
    OverCoat - China Glaze Celtic Sun 
  • 9. Base - White Cream
    F.P Fun-Fetti
    OverCoat - Sinful Colors Dream On
  • 10. Base - White Cream
    F.P Fun-Fetti
    OverCoat - Maybelline Color Show Fuchsia Fever
  • 11. Base - White Cream
    F.P Fun-Fetti
    OverCoat - Zoya Katherine
  • 12. Base - White Cream
    F.P Fun-Fetti
    OverCoat - Zoya Frida
*The items in this post were purchased by me.